How to change margins / paper size when printing to PDF on Mac OSX

So I was trying to save some D&D character sheets to PDF and noticed the bottom portion kept getting chopped off, while there was a big chunk of white space on the top of the page. What I thought would be a simple task of changing margins, turned out to be 30 minutes into searching online, without really finding a solution.

Coming from Windows, it took me a awhile to figure out that margins were set inside paper size, so I created a No Margin paper size following instructions from the help center (see below), but there wasn’t a way to choose a paper size from the Save as PDF… menu.

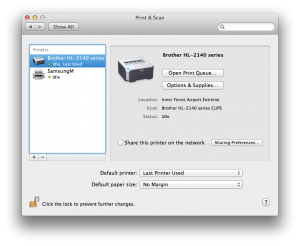
It turns out that Save as PDF… uses the default paper size set in your Print & Scan settings. If you go to Settings > Print & Scan, you’ll see a Default paper size near the bottom. Note, there isn’t a way to create a new paper size from this menu, but you can create one from any app that allows you to select a paper size from it’s print dialog (e.g. Safari)

Print & Scan Settings

From the help center:

Create a custom page size

If you want to print on paper that has an unusual size, such as an envelope or card, you may be able to choose the paper’s size from the Paper Size pop-up menu. To find the Paper Size pop-up menu, choose File > Page Setup. If you don’t see a Page Setup command, choose File > Print.

If you can’t find the size you need, you can create your own custom paper size.

  1. Do one of the following:
    • Choose File > Page Setup. Choose Page Attributes from the Settings pop-up menu, and then choose Any Printer from the Format For pop-up menu. Choosing Any Printer ensures that your document can print on any printer that supports the paper size you select.
    • If Page Setup is not available, choose File > Print. If you see a Show Details button, click it to show all available options.
  2. Choose Manage Custom Sizes from the Paper Size pop-up menu.
  3. Click the Add (+) button.
  4. Double-click the name of the paper size, and type a new name.
  5. Enter values in the Paper Size and Printer Margins fields, and then click OK.

After creating the custom paper size, go back to Settings > Print & Scan. You should now see the newly created paper size in your Default Paper Size drop down menu. If you choose the new paper size and try to Save as PDF again, you will notice that the new PDF will contain the new settings.

Hope this helps!

Apple’s Cards App NEEDS to Group Purchases

So as I mentioned a couple days ago, I’ve been playing with the Apple’s Cards App on my iPhone 4S and have been mostly satisfied with the experience so far, but I hit into a couple hitches today.

The first thing I noticed was the server was overloaded this afternoon. Half the time, I would get an alert telling me there was a problem connecting to the server and to try again later. But if I tap Buy again, it usually went through.

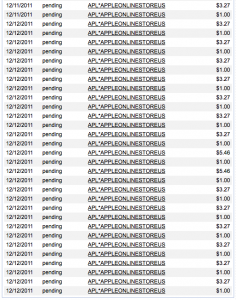
Then I got to a point where my card was being declined. I logged into my credit card’s website and looked at the pending transactions:

Apple Cards App Charges

No, I didn’t create that many cards. Half of them are $1 authorizations. Of the remaining half, about 1/3 are duplicates from server failures, which I’m hoping I won’t be charged as these duplicate orders don’t show up under my account. The cards are $2.99 each + tax. If you want to deliver them internationally, it’s $4.99 + tax.

So I expected a call from my credit card fraud/security team, but that call never came. I eventually called customer support myself assuming that the flood of Apple transactions was the cause of my card being declined. After speaking with someone on the security team, it turns out there’s a limit of 25 transactions per day before my card starts rejecting additional charges. And each of those $1 authorizations count toward that limit.

Here’s my suggestion to Apple: Please group multiple card orders like you group iTunes purchases and make one charge at the end of the day. Given it’s the holiday season, the perfect time for someone to use your Cards app, sending out 13+ cards should not be uncommon and that assume I won’t be using the credit card anywhere else that day. Plus with your server issues, some charges are showing up twice. If needed, I can even create all the cards I want beforehand and then submit them all to be charged together, but that’s currently not an option via your app. This would not only avoid having so many transactions which would easily trigger fraud alerts, but you wouldn’t have to make so many separate authorization checks. Plus it’s better for you in the long run too, since you’ll be saving on per transaction credit card fees.

I’ve already submitted the same feedback at Apple – Cards – Feedback. Hopefully we’ll see this fixed soon before the holidays are over.

Apple Cards App

Apple Cards AppGiven it’s the holiday season, I got a chance to play with Apple’s Card app. Despite the greatness of iPhone 4S’ camera, it still wasn’t as great as my Canon 60D SLR, so I took the picture I wanted with my Canon and imported it into iPhoto. Like magic, it was on my iPhone Photo Stream moments later.

The app is still rather primitive. The selection of templates to choose from was decent, but still felt lacking. I didn’t really find a particular one that stood out to me, but I guess the card is really about the photo you’ll be choosing.

After you select the photo you want, it allows you to zoom and move around. I guess if you wanted to edit the photo, you can use iPhone’s new photo editing software, which is supposedly good, but I haven’t had a chance to mess around with it yet.

The text was where I found the app lacking. There was no way to choose a different font or change the font size. When I wanted something left aligned, there wasn’t an option for that. Given a box, the font, size, and alignment were unchangeable. It also wasn’t immediately obvious that some text can be changed, but I soon found out that any text can be changed.

You can enter a name/address to mail the card to, but it was a lot easier to pick the person out from my address book.

Halfway through making a card, but need to stop temporarily? No worries. The app allows you to save the card and come back to it later.

I was hoping they would allow me to use my iTunes credit to purchase these cards, but unfortunately it’s hooked up with the Apple store and not the iTunes store. After logging in, it showed me my credit card on file and ask me to enter the card security code.

Then ZOOOOOOM, off my greeting card goes. The total cost was $2.99 + tax and I got my receipt in my email shortly.

Update: They also need to fix their Online Order Status for Cards. I’m not even talking about the inability to cancel the order as I can see how once your order is submitted, it could be processed for printing immediately. What I’m talking about is there’s no indication which order is which. You can click on order details or print invoice, but the only info you’ll see is your own. The email they send you does include who it’s for, but even on that email, there’s no confirmation of the mailing address. You can open the Cards app and confirm the mailing address there, but there’s no order # in the app so you can easily look up the order status.

Fastest and Easiest Way to Sync Sites in FileZilla on your Mac via Dropbox

FileZilla So I’ve been a long time user of FileZilla and awhile back I looked into how to share my site list across multiple machines and one method many people were doing was storing their application settings on Dropbox by modifying their fzdefaults.xml to point to a location under your Dropbox folder.
I’ve been using that method for quite some time and it generally works well. I do hit into a couple issues.

  • Besides syncing just my sites, it also synced other application settings (e.g. window size, last location) and when you have monitors with different resolutions, it starts to become annoying.
  • I ended up with a file conflicts whenever I had FileZilla running on multiple machines at the same time. Typically it was filezilla.xml and queue.sqlite3 that would end up having conflicts.
  • Because fzdefaults.xml was stored in the Application (/Application/FileZilla/Contents/SharedSupport/) and not in the user settings (~/.filezilla/), whenever I upgraded FileZilla to the newest version, it would overwrite my fzdefaults.xml file and I would have to go and fix it every time.

What I decided to do instead was create symbolic links to the files I want to sync. The only 2 files I think that matter are bookmarks.xml and sitemanager.xml.

  1. Quit FileZilla.
  2. If you’ve created/modified fzdefaults.xml in the past, back up and delete that file.
  3. Create a folder inside your Dropbox folder to save your FileZilla settings to (e.g. ~/Dropbox/FileZilla/).
  4. Move your existing bookmarks.xml and sitemanager.xml that you want to share from ~/.filezilla/ to ~/Dropbox/FileZilla/. You may need to do this inside a terminal.
  5. Create symbolic links for those 2 files:
    ln -s ~/Dropbox/FileZilla/bookmarks.xml ~/.filezilla/bookmarks.xml
    ln -s ~/Dropbox/FileZilla/sitemanager.xml ~/.filezilla/sitemanager.xml
    Once again, you’ll need to do this inside a terminal.
  6. Start FileZilla and make sure everything is working.
  7. Create symbolic links similarly for the rest of your computers.

No Simple Solution To Convert Analog Computer Speakers to Accept Optical / Digital Input

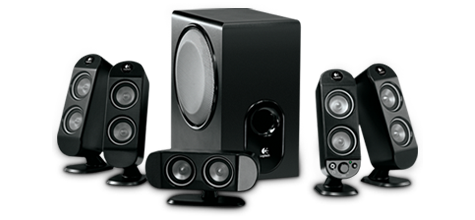
Logitech X-530 Speakers

After switching to the Mac mini, I haven’t been fully utilizing my 5.1 speakers. The Mac mini only supports stereo mini and optical outputs and my Logitech X-530s are analog computer speakers. Currently, only the L/R speakers are enabled and I wanted to remedy that.

First I tried looking for some cheap surround sound optical speakers, but hardly anyone seems to make them these days. Back in the day, there were Creative Soundworks, Klipsch, and Logitech. The only one I found was the Logitech Z-906, which many reviews are saying aren’t as good as its predecessor, the Logitech Z-5500. Either way, the Logitech Z-906 costs ~$300 and for that price, I might as well go for a real receiver.

Second, I tried to see if there was any device that would take optical input and output surround sound. Apparently these devices aren’t exactly that popular. I did find 2:

They cost about $60-80 and are made from brands I’ve never heard of. The build quality from the pictures also look rather crappy.

If I were indeed going to get a receiver, I wondered if I’d be able to reuse my existing speakers. Was there something that would convert 3.5mm stereo mini / RCA to regular speaker wires. Apparently a quick search showed me how stupid I was for thinking that. I forget the terminology they used, but it had something to do with computer speakers being powered and you may end up damaging your hardware if you ever mix them.

I wonder if a home theater setup for my computer will be overkill… Then again, I sit in front of my computer multiple magnitudes more than I sit in front of my TV. Hmmmmm… I don’t really need something that fancy. I’m currently looking at the Onkyo HT-S3400 (Newegg / Amazon), both which have it for $260 and appear to be the lowest it’s been (price comparison).

Getting Around Incorrect Password When Trying to Enable SMB on Mac OSX

So with my files halfway transferred, I began to setup file sharing on Mac OSX Lion. Things were pretty straight forward. Go to Sharing; enable File Sharing; add the directory I want to share; modify the access rights. To enable SAMBA, I just had to go into Options… and check Share files and folders using SMB (Windows) and select the Windows account(s) I want to have access to the file shares.

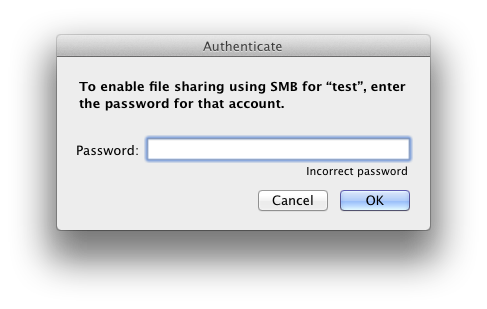
My HTPC uses a different login and I wanted to add a sharing only account to the access list. Simple enough. Click the + button and set the username and password and also enable it for SMB. But then I kept getting this error:

Mac OSX SMB Incorrect Password

To enable file sharing using SMB for “login”, enter the password password for that account.

Incorrect password

I’ve double checked to make sure I had the right password and even tried deleting the account and creating a new one, but couldn’t understand why it kept thinking my password was incorrect. One thought was maybe sharing only accounts couldn’t have SMB access? So I started searching for a solution online. A couple people seem to have hit into this issue, but no one seemed to have found a solution.

Solution:

To fix this, instead of creating the new account inside the Sharing window, go to Users & Groups and create a new Sharing Only account there. It requires the same fields, but when you try to enable SMB for that account, you won’t get the “incorrect password” message anymore.

Hope this helps!

Project Get Rid of PCs

So Project Get Rid of PCs is officially underway! I decided I had too many computers running in my house and 2 of them are just fancy file servers. Now that I switched to a Mac mini, my Windows desktop has become nothing more than my video encoder / Quicken host, which I plan on converting to a VM.

Unofficially, this is also called Project Conserve Energy (for those who might not share my opinion on Mac OSX, you must at least agree conserving energy is good). I’ll be able to power down 3 full computers (hosting a total of 12 HDDs running 24/7) and replace them with 4 power-saving external USB drives.

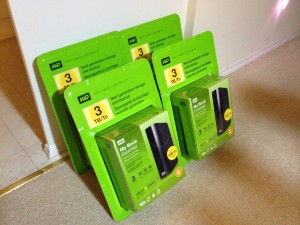
I was initially planning to start this project during holidays, but with the floods in Thailand and the expected hard drive shortages, I decided to get them before the price was blown out of proportion. Costco had a coupon where the Western Digital 3TB drives would be $20 off and when SlickDeals reported the final price was $110, I decided to bite.

Even though Costco’s coupon showed a limit of 5 per customer, they had a sign up that said limit 2 due to the flooding in Thailand. SlickDeals did report you can actually bypass the limit as long as it’s only 2 per transaction.

Anyway, I pulled Derek along since these hard drives were going to come out of HD-Trailers.net’s budget, but was sad to find out that Issaquah was sold out of them. Their computer showed 6 in stock, but probably in people’s cart. The told us that Kirkland still had ~30 in stock and Derek was cool enough to take a side trip to Kirkland Costco. We each picked up 2 and my original estimation of ~$500 came pretty close. I had altered my estimated cost to ~$600 after I heard about the flooding in Thailand.

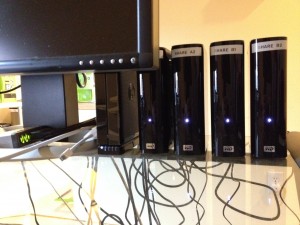
Western Digital My Book Essential 3TB External USB Drives

The plan was to have 2 sets of mirrored drives (RAID 1) and as Ryan has painfully found out, it’s impossible to use the Apple software to raid 3TBs. I went ahead and installed SoftRAID and setting up the arrays was really easy.

External USB Drive Setup

Now comes the long part of moving all the crap off my existing file servers onto these external USB drives.

Google Testing Out New YouTube on Chrome?

To back up the story a bit on why I was using Chrome, Derek has convinced me to abandon Adobe Flash a long while back and so far it’s worked out pretty well. I use Firefox as my main browser, but in the small chance that I need to use Flash (e.g. a particular YouTube video that doesn’t have HTML5/webm support yet), I switch over to Chrome, which comes with Flash support built-in.

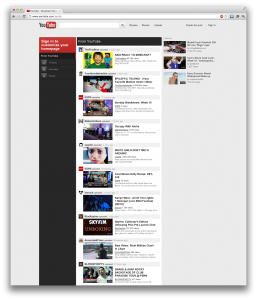
So last night I noticed a big change in YouTube’s UI:

YouTube on Chrome

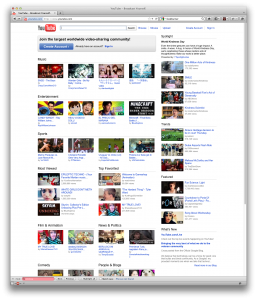
But was shocked to find out they reverted back today:

YouTube on Firefox

Turns out if you’re using Chrome, you get their new shiny unified (Google Plus) interface, but if you’re using any other browser (so far I’ve tested Firefox and Safari), you get their old look.

iPod nano (1st Generation) Replacement Program

I just got the following email from Apple:

iPod nano (1st generation)Dear iPod nano owner,

Apple has determined that, in very rare cases, the battery in the iPod nano (1st generation) may overheat and pose a safety risk. Affected iPod nanos were sold between September 2005 and December 2006.

This issue has been traced to a single battery supplier that produced batteries with a manufacturing defect. While the possibility of an incident is rare, the likelihood increases as the battery ages.

Apple recommends that you stop using your iPod nano (1st gen) and follow the process noted below to order a replacement unit, free of charge.

Note: This battery issue is specific to the iPod nano (1st gen) and does not affect any other iPod.

Replacement Process

You may order a replacement unit via the web. Click here to begin.

Your iPod nano serial number will be checked to verify that it is eligible for this program. You will receive a replacement unit approximately 6 weeks after we receive your current iPod nano (1st gen).

If you have a personalized iPod nano, you will receive a non-personalized replacement. Make sure to use iTunes to back up any data on your current iPod nano before sending it in for a replacement unit.

Additional Information

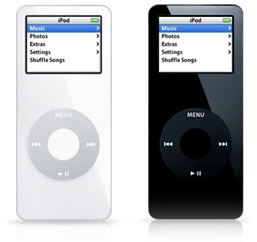
Identifying an iPod nano (1st gen):

  • It has a black or white plastic front and a silver metal back – later iPod nano models have a metal front and back.

If you need assistance with placing an order, please visit an Apple Retail Store or an Apple Authorized Service Provider (AASP) and bring your iPod nano with you for serial number validation.

Your replacement iPod product is warranted to be free from defects for 90 days from the date of service.

Thank you for participating in this program.

Sincerely,

Apple

I still remember the day Apple announced the iPod nano and I knew I wanted it. I just started working at Microsoft for a couple months and the deal hunter in me still didn’t purchase things at full retail price. But it was SO tiny! When I found out that Microsoft got a discount with Apple, I pulled the trigger the same day.

These days I leave it in my car as my source of music, which works out well because it’s so tiny.

Not only am I surprised that Apple is still supporting this device given that it’s already over 6 years old (released in 9/2005), but that they actually have spare 1st gens to replace them with. Maybe they’re just replacing the batteries, but if that’s the case, it might just be cheaper to replace them with the current or previous generation iPod nanos. I guess having reports of 1st gen iPod nanos bursting into flames will always be bad PR.

Looks like you’ll have to ship the old one back in order to get the new one.

Thank you.

Your request has been submitted.

Apple will send you a box with shipping instructions to mail your iPod nano to us. Apple will then send you a replacement iPod.

Please save a PDF of this page for your records. You can check the status of your request via Check My Repair Status using your Repair ID, shown on the left of this page.

Update: It’s been confirmed by Mashable that the replacements will be 1st generation iPod nanos. Now I’m really curious how they still have stock!

How to Capture and Record Your Screen with Computer Audio on Mac OSX

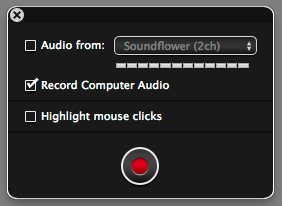
Update 2012/12/24: After a year, it looks like people are still finding this blog post. I personally had a lot of trouble using QuickTime after upgrading to Mountain Lion where my computer would become super slow whenever I tried to screen capture with it. Instead I have found a new piece of wonderful software called Voila (was provided an affiliate link to use from Global Delight). It isn’t free unfortunately, but for $10, the amount of hassle you save is worth it. One of the feature that it includes is the ability to capture computer audio without using the SoundFlower trick below which is very convenient.

Voila Record Computer Audio

Original Post:

So I was looking for a software to capture my computer screen on Mac OSX and was surprised that the newest QuickTime (version 10) comes with a screen recording feature. It can record both your entire screen or or just a selected area, thought there appears to be a minimum height/width it requires.

It encodes the video in H.264 and audio in AAC, both which are excellent and widely supported codecs. I’m not sure if these are changeable or configurable, but worse case you can easily re-encode it afterwards.

One caveat of using QuickTime (or just about any screen recording software) is that there isn’t a easy way to record the computer audio. Some soundcards come with drivers that has an input that is the computer audio output, but Mac by default doesn’t. QuickTime will allow you to record from line-in, so if wanted, you can purchase a short 3.5mm mini-stereo cable and connect your audio output to audio input.

I did a little search online and found an interesting software called Soundflower by Cycling 74 and basically what it does is that it loops the audio back into the computer as an input, allowing QuickTime and any other software to record the computer audio.

Instructions for enabling Sunflower (computer audio):

  1. Install Soundflower. You can download the latest version from code.google.com (Soundflower homepage)
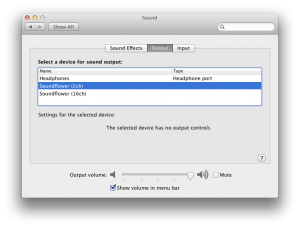
  2. Go to System Preferences > Sound and see if the new outputs exist: Soundflower (2ch) and Soundflower (16ch). If not, you may need to restart your computer.
    sound preferences with soundflower
  3. Select Soundflower (2ch) as your output. 2 channels/stereo should be sufficient in most scenarios, but feel free to use the 16 channels one.
  4. Audio should have stopped coming out of your speakers/headphones. In the event you still want audio to come out of your speakers, Soundflower comes with a solution. Launch Soundflowerbed from your Applications folder.
  5. You should find a new flower icon in your status icon area in the upper right hand corner.
  6. Click on the flower icon and select Built-in Output under Soundflower (2ch). Audio should began coming out of your speakers once again.

Instructions for recording your computer screen:

  1. Open QuickTime
  2. Click on File > New Screen Recording
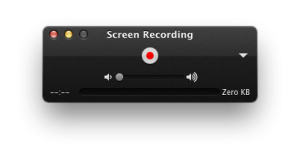
  3. You should see the following screen:
    QuickTime - New Screen Recording
  4. On the right hand side, you should see a little arrow pointing down. Click on it.
  5. Under Microphone, you should now see Soundflower (2ch) as an option. Select that.
  6. Click on the red dot and you will be able to select the area you want to record by dragging a box around the area.
  7. If you want to record the whole screen, just click anywhere on the screen.

That’s it!

After you’re done recording, I would highly recommend that you switch back your sound output to the Built-in Output. I’ve noticed a degradation of sound quality between the two.