So I was trying to save some D&D character sheets to PDF and noticed the bottom portion kept getting chopped off, while there was a big chunk of white space on the top of the page. What I thought would be a simple task of changing margins, turned out to be 30 minutes into searching online, without really finding a solution.
Coming from Windows, it took me a awhile to figure out that margins were set inside paper size, so I created a No Margin paper size following instructions from the help center (see below), but there wasn’t a way to choose a paper size from the Save as PDF… menu.
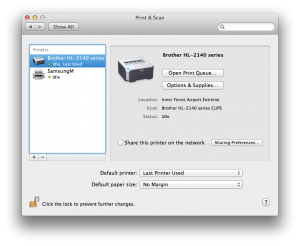
It turns out that Save as PDF… uses the default paper size set in your Print & Scan settings. If you go to Settings > Print & Scan, you’ll see a Default paper size near the bottom. Note, there isn’t a way to create a new paper size from this menu, but you can create one from any app that allows you to select a paper size from it’s print dialog (e.g. Safari)
From the help center:
Create a custom page size
If you want to print on paper that has an unusual size, such as an envelope or card, you may be able to choose the paper’s size from the Paper Size pop-up menu. To find the Paper Size pop-up menu, choose File > Page Setup. If you don’t see a Page Setup command, choose File > Print.
If you can’t find the size you need, you can create your own custom paper size.
- Do one of the following:
- Choose File > Page Setup. Choose Page Attributes from the Settings pop-up menu, and then choose Any Printer from the Format For pop-up menu. Choosing Any Printer ensures that your document can print on any printer that supports the paper size you select.
- If Page Setup is not available, choose File > Print. If you see a Show Details button, click it to show all available options.
- Choose Manage Custom Sizes from the Paper Size pop-up menu.
- Click the Add (+) button.
- Double-click the name of the paper size, and type a new name.
- Enter values in the Paper Size and Printer Margins fields, and then click OK.
After creating the custom paper size, go back to Settings > Print & Scan. You should now see the newly created paper size in your Default Paper Size drop down menu. If you choose the new paper size and try to Save as PDF again, you will notice that the new PDF will contain the new settings.
Hope this helps!

