
Previous Storage Solutions
So I had used Windows Home Server when it first came out and loved their Drive Extender feature. It allowed you to add as many drives into a pool and then create shared folders. You can specify how many copies of a file you wanted for each shared folder, therefore providing redundancy. I was extremely sad when they announced that Drive Extender would be removed from Windows Home Server 2011, meaning I would have to look for a new solution.
In the meantime, I had switched to using Macs and had began using SoftRAID as my storage solution. Ultimately, I was highly disappointed with the software given its price. I had set up 2 volumes, a 6TB RAID-0 array and a 3TB RAID-1 array. Both arrays consists of 2 external USB 3TB drives. Things worked great as long as you didn’t reboot. But when you did reboot, there was a 25% chance that the USB drive wouldn’t be mounted in time before SoftRAID times out and marks the array as degraded. Things would be fine if you could just re-add the drive to the array, but unfortunatey it didn’t work like that. It required you to reinitialize the drive and add it as if it was a brand new drive to the array. The rebuild was the worse part as it took 2 days for the drive to be fully rebuilt.
I’ve sent numerous emails to their support requesting the ability to set a drive to read-only until the mirrored drive is remounted or replaced, but it’s fallen on deaf ears. And I’m not the only one that’s hit into this problem. I’m happy to say I’ve officially uninstalled and completely removed SoftRAID from my machine.
Awhile back, I had read about Greyhole being an alternative to Windows Home Server Drive Extender, and finally decided to check it out.
Building the Rig
I decided that I need to build a new rig for my storage server, mainly due to the fact I wanted to take advantage that my external USB drives were USB 3.0.
I had picked up a barebone combo from Newegg a couple weeks ago for less than $200, which included BIOSTAR Hi-Fi A85W, AMD A10-5800K Trinity 3.8GHz, G.SKILL Ripjaws X Series 8GB 240-Pin DDR3 SDRAM. The main reason this combo worked out was because it included everything (sans case and power supply). It also had 8 on-board SATA ports as well as onboard graphics. It’s a pity it only came with 1 stick of RAM, but do I really need more than 8GB of RAM for a file server? There was some free headphones too, but that’ll probably end up in my pile of useless junk in my garage.
I had also picked up a USB 3.0 motherboard adapter, giving me 2 extra USB 3.0 ports.
USB 3.0 Hubs
I don’t know why, but USB hubs tend to fail when dealing with large amounts of data transfers. I’ve tried at least a dozen different USB hubs, and the only one that has work consistently was this Belkin 7-port USB hub, but unfortunately this only supported up to USB 2.0.
Even after the USB 3.0 motherboard adapter, I now had 4x USB 3.0 ports, but 6 external USB drives. So I decided to try Monoprice’s 4-port USB 3.0 hub and am sad to report that it also fails under the high bandwidth scenario. By fail, I mean drives just disappear from the system, and that’s not good for a storage server.
So I ended up connecting 4 of the drives directly to the motherboard’s USB 3.0 ports and 2 of them to USB 2.0 ports. If someone has a good USB 3.0 hub recommendation, I’m all ears.
Installing Amahi + Greyhole
Why Amahi? Greyhole is the storage pool software, but Amahi provides a decent user interface on top of it. Since Amahi recommended Ubuntu 12.04 LTS, that’s what I installed. Ubuntu’s install was rather straight forward. I had to burn a DVD for the first time in a long while. Apparently getting Ubuntu to install via a USB thumbdrive isn’t very straight forward.
Following their instructions, I had a bit of a problem getting Amahi installed. It would failed randomly throughout the installation process, but the third time was the charm. I forgot what I did to fix it, but recall installing some dependencies it was expecting. It also probably explains why Greyhole wasn’t setup properly and I had to rerun the initialization scripts to setup the mysql databases.
Adding Drives
Following their instructions, I got all my drives setup and auto-mounted. I recommend appending nobootwait in your options, so if Ubuntu fails to mount your hdd, it won’t just hang. It’s unfortunate that it will block before the ssh daemon is started, providing no way to fix this remotely, even if you just want it to continue w/o mounting the drive.
I would also recommend physically labeling your drives to match up with their mount location (e.g. drive1, drive2, etc.) so you know which drive is which when it dies and know which one to replace. Fortunately with Greyhole, even if you accidentally remove the wrong drive, sticking it back in is not that big of a deal.
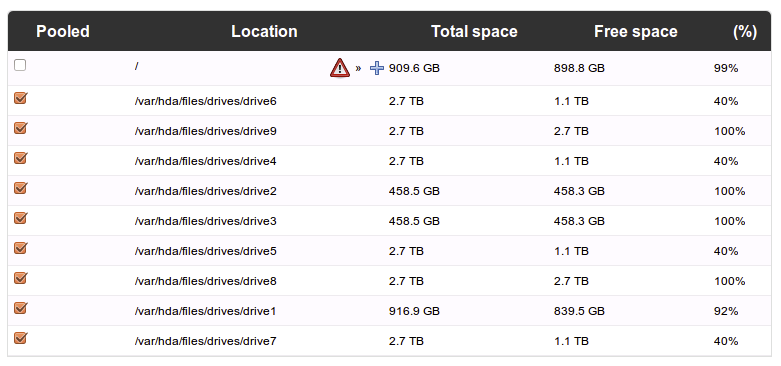
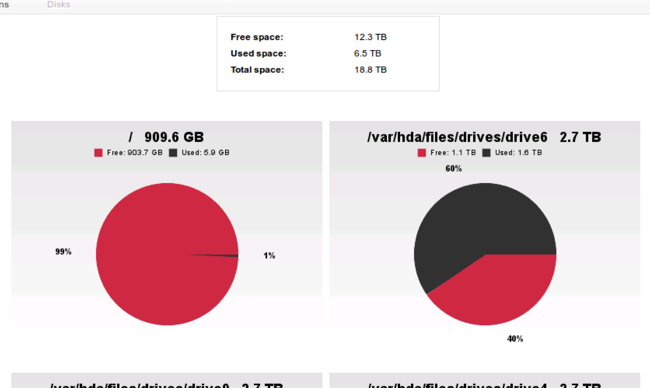
Once the drives are added, they should show up on your Dashboard > Storage:
Setting up Greyhole
By default, Greyhole is disabled and you’ll have to enable it in advanced settings. Once enabled, more options under Shares should show up. First you’ll have to select which drives you want to be part of the storage pool. As you can see from screenshot at the top, I’ve enabled everything beside my main OS drive. Adding the main OS drive to the pool is not recommended as you don’t want to run out of space on that drive.
New options should also show up for the shared folders:
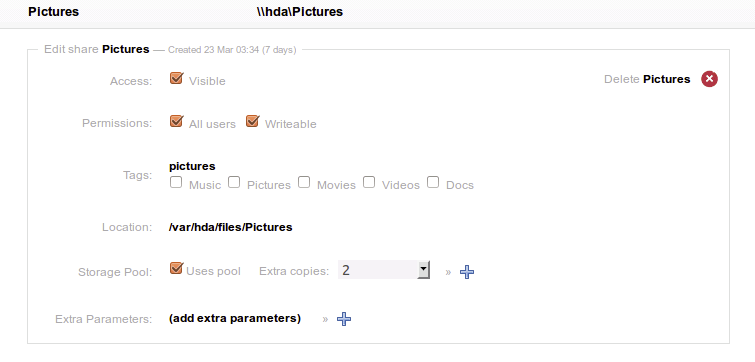
As you can see, I enabled this specific share to use the pool and to have 2 extra copies (so a total of 3 copies of each file on 3 separate drives). The # of extra copies you can set ranges from 0 to max (# of drives in your pool).
Connecting to Shared Folders
Greyhole exposes these shared folders as SMB/CIFS network drives, very much like Windows shared folders. By default it adds an hda machine name to your network, so to connect to it on a Mac, you’ll connect to smb://hda/name_of_share.
I’ve found that on the Mac, if you want it to automatically connect to the network share, the easiest way is to drag and drop the share to your list of login items in Settings > Users & Groups. Unfortunately this has the side effect of opening all the share windows when you login. In my case I have about 10 different share folders that get opened upon logging in.
How Greyhole Works
One of the things that confused me early on was the fact that after making changes to a particular share, Greyhole didn’t seem to do anything. Logs showed that it was just sleeping, even though I just told it to add an extra copy of everything in this non-empty share.
It turns out Greyhole is a daemon service and it will act when new files show up, but any settings changes you make to an existing share don’t actually execute until it does it’s nightly file system check. I’ve learnt you can manually trigger the file system check by running sudo greyhole -fsck.
When you copy files into a share, they all get dumped into a default location (configurable). The greyhole daemon service will kick in and depending on your settings, begin moving or duplicating files onto drives designated to be part of the pool.
I do have to warn you never to run sudo greyhole -D as it starts a new instance of the Greyhole daemon which confuses the shit out of each other. When one service was copying a file, another was deleting it. When the 1st service sees the file is now gone, it assumed the user deleted it and deletes all its copies. Good thing I always double check with rsync to make sure all copied files are good.
What you should do instead is: sudo service greyhole start | restart | stop
Greyhole also has an option to balance available space among the drives, which I assume means if you added a new drive to the pool, it would shift the files around, so you won’t have one drive that is fully packed, while another is completely empty. The command to do this is sudo greyhole -l, but I haven’t really seen it do much.
Removing / Replacing Drives
One of the best benefits of Greyhole / Drive Extender is the ease of adding/removing drives. I’ve already discussed about adding drives, and removing drives isn’t that much more work. If a drive is still working, but will be removed, you mark it as “going”. Greyhole will begin to move the files off of it onto other drives in the pool. If a drive is dead, you mark it as “gone”. For files that don’t have extra copies, unfortunately those aren’t recoverable. For files that do have duplicate copies, Greyhole will begin duplicating them off other drives to ensure the # of copies matches your settings.
Once the process completes, it’s safe to remove the drive.
Trash
You ever get that dreaded warning when you’re deleting files from a network share warning you that deleting this file will be permanent? Yeah, I always double check to make sure I didn’t accidentally select the wrong file (god forgive, wrong folders). With Greyhole, when you delete a file, it gets moved to a Trash shared folder, which you can mount and access like your recycle bin. To empty the trash, just run sudo greyhole -a
Monitoring Greyhole
There’s a couple ways to monitor what Greyhole is doing.
watch greyhole -qdisplays your list of shares and # of operations queued.greyhole -sshows you the stats of your drives (e.g total/free space)greyhole -Sshows you a summary of what Greyhole is doing.greyhole -Ltails the log file telling you exactly what it’s doing.
Remote Access
A couple things you want to install right off the bat are openssh server and vncserver.
I found it rather weird that a linux distro didn’t have an ssh daemon installed by default. It does have vnc server, but it requires you to login at the console before you can “share desktop”. The reason why you need VNC is because the Amahi dashboard is only accessible on that machine. For most Greyhole functions, you can control it via SSH.
I had a lot of trouble getting the VNC server working (w/o having a user logged in). Unfortunately detailing how I got it to work would be another giant post in itself, but if you have questions, leave a comment below and I’ll try my best to answer.
